Some Windows users have reported seeing an error message saying that “Your PIN is no longer available due to a change to the security settings on this device,” and this issue is common for Windows 10 and 11 users.
As you should know, Microsoft released on October 5 a new version of its operating system: Windows 11. Unfortunately, some people are reporting that they are no longer able to sign in to their accounts after installing the update.
Windows has two types of accounts: a local account and a Microsoft account. What differentiates the two is that your Microsoft ID is being used in the Microsoft account while no email is used against your account in a local account.
When you click on the “Set up my PIN” option, you get redirected to the same page, and when they enter the PIN, they find the same error code. Unfortunately, this is an ongoing problem by Microsoft, and there hasn’t been any concrete solution to this yet. Users suggest workarounds, but no official response from Microsoft has been provided.
Experts often recommend using PIN sign-in options as opposed to traditional passwords. In addition, if you have a Windows Hello-supported device, you can set up face recognition after you set up the PIN.
This is because the passwords are stored on the server, whereas PINs are stored on the device. So, hackers could theoretically access your password. But if someone cracks your PIN, the he won’t be able to access your account unless he’s using the actual device tied to it.
According to Microsoft, in Windows 10, the PIN is backed by a Trusted Platform Module (TPM) chip, a secure crypto-processor designed to carry out cryptographic operations. So any changes in the TPM chip (including clearing it up) and the PIN associated with it might not work then.
When this happen, you’ll get this message when you use the PIN option to sign in to your device:
Your PIN is no longer available due to a change in the security setting on this device. You can set up your PIN again by going to Settings > Account > Sign-in options.
What causes the error ‘Something happened, and your PIN isn’t available’?
This error message comes from the PIN service running on your Windows software. Unfortunately, the service responsible for managing PINs doesn’t work as expected, and even when prompted to add a new PIN, it doesn’t respond.
Other sources have found that the possible causes are:
- A bug in the Windows Update that might have broken the PIN sign-in option
- Corrupt files in the Ngc folder
If your pin is not available, you will have to set it up again. Here is what you can do:
When this happens, your user is completely locked from accessing Windows. In some cases, the safe mode isn’t accessible, complicating stuff and risks you losing your data when you reset your system.
Here are some simple tips that might work:
- Try to restart your system a couple of times. The login pin option might work after a few restarts
- Try to disconnect from the internet and then try again. You can take out the Ethernet cable if that’s what you are using. If you are wirelessly connected, get to the login screen, and you should be able to see your Wi-Fi option on the right bottom corner. Turn off your Wi-Fi from there and reboot.
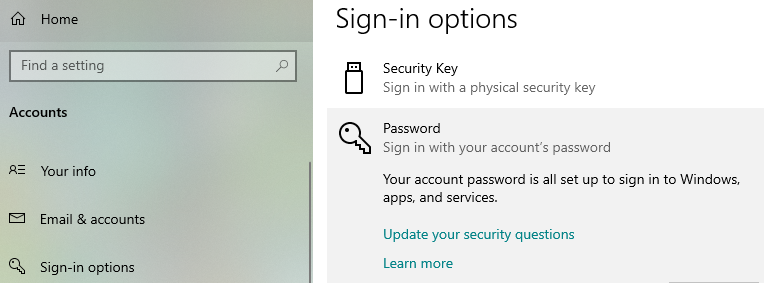
- Use your password option by clicking on the Sign-in options on the login screen. Once you are in your Windows, go to Settings > Accounts > Sign-in Options > Remove PIN and then Add PIN.
Sign in using a password
If you have access to your account password, you can attempt logging in through it instead. The PIN offers a quick way to log into your Windows machine, but you also can switch to a password. Once logged in, you can disable the PIN in Windows Hello settings, and you will be good to go.
- Navigate to the startup screen, where you must enter your PIN and click on the key icon to log in through your password.
- After logging into Windows, click Windows + I to launch Settings and click on the Accounts option.
- Now, remove the PIN from the list of sign-in options and select the password.
- Save changes and exit. Restart your computer and check if the PIN is removed.
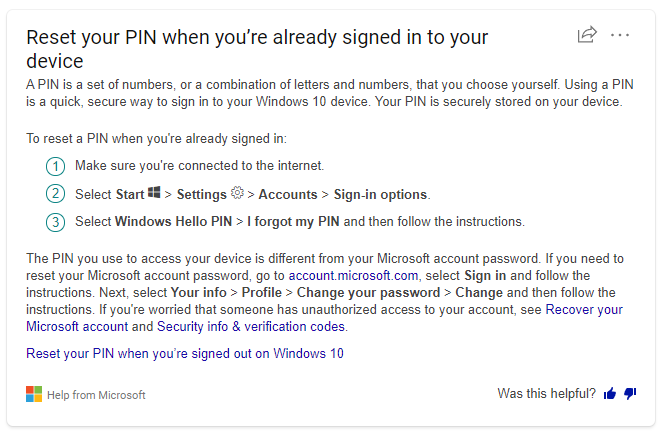
Resetting your PIN in Settings
Another thing you can try is resetting your PIN from your account settings. This will remove the previous entry if it is corrupt and help you set up a new one.
- Press Windows + Launch Settings. Next, click on Accounts.
- Now, click on I forgot my PIN and follow the steps later.
Here is a summary of instructions by Microsoft to reset your PIN.
In addition, we provide a verified solution if none of the above methods work. Your last resort is to reset your system entirely, and this will completely erase your current installed applications, but it will resolve the PIN problem. Make sure that you select the option “Keep my files” and follow these prompts:
- Insert the installation media into your system and restart it by going to the ‘Start Menu < Power < Restart.’
- Now, navigate the ‘Boot Menu’ and select ‘Removable Devices.’ Then, your system will display the following message: “Press any key to boot from USB”.
- If you’ve created the installation media on DVD or CD, you don’t have to go to the boot options because the system will automatically detect the inserted CD or DVD. Now your system will show the following message: “Press any key to boot from CD or DVD.”
- After pressing the key, you will enter the Windows Setup wizard. From here, you will choose your Windows language, Time format, and Input method and click on the Next option.
- In the next window, choose the ‘Repair your computer’ option and wait for Windows to get ready to repair your system.
- In the repair window, choose the ‘Troubleshoot’ option.
- Now, select ‘Advanced options’ in the Troubleshoot window.
- Then, pick the ‘Command Prompt’ option to open the CMD window.
- In the CMD window, type the following command to view your system’s name and hit the ‘Enter’ key: diskpart
- Then, type the following command and hit the ‘Enter’ key again. This will list all the created partitions and attached drives on your system.
- Now pick your System Reserved volume by looking at the ‘Info’ column and choosing the entry displaying ‘System’ as its value.
- When you’ve found your system’s reserved drive’s volume number, type ‘select volume 0’ and press the ‘Enter’ key. Note: Replace the number ‘0’ with your System Reserved drive number.
- Once you have selected the drive, the CMD will show the following message: “Volume 0 is the selected volume”.
- Now assign a brief letter to the selected volume (for example, the letter ‘Z’) by typing ‘assign letter=Z’ and pressing the ‘Enter’ key. So, CMD will show the following message: “Diskpart successfully assigned the drive letter or mount point”.
- Now type ‘exit’ and press the ‘Enter’ key. This time, CMD will show: “Leaving diskpart…”
- After that, you will need to generate the boot files for the UEFI environment. So, type the following command and press the ‘Enter’ key:
bcdboot C (this letter represents the boot Drive, and you can replace it with your boot drive letter): \windows /s Z: /f UEFI - The CMD will show the following message upon successfully executing the above-typed command: “Boot files successfully created”
- Now the whole process is completed. So, close the command prompt and restart your system.
Clear the TPM
Bear in mind that this issue can manifest in different ways, and one of them is that when users upgrade to Windows 10 (specifically the April 2018 Update -V1803), the PIN sign-in can be affected.
It all started with the ‘Reset your security processor to fix functionality issues‘ message, appearing after the V1803 update. To fix this warning, users usually opt to clear the TPM.
In case you’re a victim of this issue, try the following steps:
- First, use the password sign-in option on the login screen to get into your account.
- Then try to change your PIN from Settings app > Accounts > Sign-in options. After changing or creating a new PIN, verify if the issue still occurs. It must be resolved by now.
- If the issue persists and you can’t change or add a new PIN as well, try the following steps:
FIX 1 – By Altering Permissions
Press the Windows button + E to open File Explorer and click View > Show/hide and check Hidden items. Assuming Windows is installed on C: drive, navigate to C:\Windows\ServiceProfiles\LocalService\AppData\Local\Microsoft folder. Then right-click on the Ngc folder and select Properties:
- Switch to the Security tab on the property sheet and click Advanced.
- Click on ‘Change link against Owner under Advanced Security Settings for Ngc window.’ Then, take ownership of the Ngc folder using these steps:
- Open Command Prompt with Administrative privileges.
- Use the following commands to take ownership:
- For taking ownership of a file for a currently logged user: takeown /F “full path of file”
- For taking ownership of a file for a group of administrators: takeown /F “full path of file” /A
- For taking ownership of folder/drive for a currently logged user: takeown /F “full path of folder/drive“ /R
- For taking ownership of folder/drive for a group of administrators: takeown /F “full path of folder/drive“ /A /R.
If none of the Methods have resolved the issue for you, we recommend using the Restore Repair Tool to scan the repositories to replace corrupt and missing files. This works in most cases where the problem originates due to system corruption.
Final Lines
As you can see, this somewhat complicated issue can be fixed easier as most people think. The message ‘Your Pin is no Longer Available Due to a Change in Security Settings’ should not be a barrier and you can continue with your work.
But if you still don’t feel confident enough in your computer skills, maybe taking it to an expert would be wiser.
More Posts for You:

![Solved: How To Change your AT&T WiFi Password [Guide]](https://techfactss.com/wp-content/uploads/2020/04/ATT-WiFi-Password.jpg "Solved: How To Change your AT&T WiFi Password [Guide]")

)