
Do you want to know how to manage a Skype interview with a proxy? Then this particular post is for you.
Skype is one of the most popular instant messaging and video calling apps in the world. Recently, due to the COVID-19 pandemic, the use of such applications has increased a lot. There are various communication applications available out there.
However, Skype is one of the oldest in this case. So, many people are still using Skype as their main communication application.
Also, Skype is available on all sorts of devices and operating systems. Now, due to various reasons, you might want to use Skype with a proxy. Whenever you are using Skype with a proxy, your IP address will be changed.
So, if Skype is blocked in your location, you will be able to unblock it. In this post, we will be sharing various methods of managing Skype interviews with proxy.
So, let’s get to it…
Tutorial on How to Manage Skype Interview with Proxy
There are a lot of different methods to use Skype with proxy. However, not all of the methods are easy to execute. As a result, we will share a few methods in this section.
So, you can choose any of these methods depending on your preference. So, here we go…
Method #1 Using Proxifier
Proxifier is a proxy client application. With the help of this app, you will be able to operate network applications through an HTTPS or SOCKS proxy and chains. That means you can use Skype with proxy using Proxifier with ease.
Earlier, Proxifier was free. However, with the new version, they have made it premium. But lucky for you, Proxifier still has a 31-day free trial. That means you can use the Proxifier application and all of its features for 31 days without paying any fees.
After using it for the evaluation period, you can buy it if you have liked its service. Now, first of all, we will need to set up a proxy server using Proxifier. Then you will be able to start using Skype with proxy.
In this next part, we will share how to set up a proxy using Proxifier. Let’s see how…
Steps to Follow
- First of all, you will need to download and install the Proxifier on your PC. It is better to download the latest version. There is a standard .exe version and a portable version. The portable version doesn’t need to be installed.
- After you have downloaded and installed the app, you need to launch it.
- Now, you will need to create a new proxy server for using it with Skype.
- To do that, go to the free proxy list from your favorite browser. On that page, scroll down a bit, and you will find the ‘Free Proxy List’. On that list, you will find IP addresses, ports, country codes, anonymity, and a few other information.
- You can pick any of these IP addresses depending on your preference. Remember, not all of these IPs will work. So, you might have to try this multiple times.
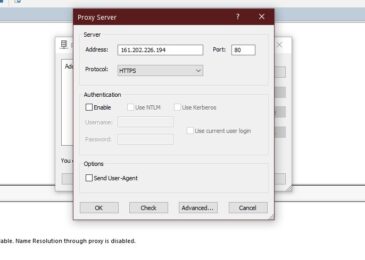
- Now, let’s say you have chosen the IP Address 160.16.77.108 from Japan with port 3128. Now, copy the IP Address from there.
- Then, go to Proxifier and then click on the ‘Profile’ option from the top menu bar.
- Next, you can click on the ‘Proxy Servers…’ option from the dropdown menu.
- After that, you will see a popup window. Now, click on the ‘Add’ button on the right corner of the popup window.
- Then, paste the IP Address on the blank box next to the ‘Address’ box. And, then paste the Port on the ‘Port’ box.
- After that, click on the Protocol option, and a drop-down will appear. From there, you can tap on the HTTPS option
- Now, click on the ‘Check’ button from the bottom of the popup window.
- After you have done that, a test will begin. Most of the time, you will find a result with ‘Testing failed’. That means that the proxy server is not working. So you will need to copy another IP Address and ‘Check’ again.
- If you want to get a working proxy, then you should choose an IP Address that has ‘Yes’ on the HTTPS box.
- Once you have got a working proxy, you will see a status like this – ‘Proxy is ready to work with Proxifier!’
- After that, click on the OK button.
- Next, click on the ‘OK’ button on the Proxy Server window.
- Once again, click on the OK button to exit the next window.
- At this moment, a popup notification will arrive about Proxification Rules. So click on the ‘Yes’ button.
- In doing so, a new popup window will appear. On that window, click on the ‘Add’ button.
- You will see another window has appeared where you will be able to create the proxification rule.
- So, on the name of the box, type in Skype. Then on the ‘Applications’ box, you need to type in skype.exe.
- Then, on the ‘Action’ box, you need to select the proxy you had just added a while ago.
- After that, click on the OK button to exit the window.
- And then, you will need to click the ‘OK’ button once again to close the popup window.
So, now you have set up a proxy with Proxifier and assigned a proxification rule for Skype. So, from now on, first, launch Proxifier. And then, if you lunch Skype, it will be using that proxy server.
Method #2 Contact Your ISP
If you are not tech-savvy, then you can actually contact your ISP (Internet Service Provider). It would be best to let them know that you want to set up a proxy server for Skype.
It would be best to tell them that they need to configure it using the system environment property “HTTPS_PROXY”. And they need to use the following format:
- HTTPS_PROXY=http(s)://username:password@hostname:port
That is it. After your ISP has set up a proxy with the information shared above, you can restart your PC. Then launch Skype, and it will be connected through a proxy server.
Method #3 Use A VPN
Another great way to use Skype with proxy is to use VPN (Virtual Private Network). Normally, you can easily set up a VPN network.
However, there are hundreds of VPN applications available out there. So, you can use any of them and use Skype.
Also, you can use any VPN extension on your browser. And then, you can use the Skype web version on the browser where the extension is used. Remember, there are free and premium VPN applications. It is better to use paid ones.
Also, if you are using Skype on your mobile device, you can use VPN apps. On Play Store and App Store, there are a ton of VPN apps available. After installing the VPN app of your choice on your smartphone, you need to launch the app.
Then, there will be options to choose a proxy country from a list. So, choose your preferred country from the list and tap on the ‘Connect’ button. It will connect instantly.
For better connection quality, you can also use the ‘Best Choice’ option. That way, the app will find the best country to connect to at that moment.
Final Lines
Skype is a significant application for communication purposes in this day and age. But sometimes, you might need to use a proxy to access Skype in your location.
There are many ways you can use Skype with proxy. And for you, we have described most of the efficient and effective ways to manage Skype interviews with proxy in this post.
We believe this article was helpful to you. If you have found this useful, then don’t hesitate to share it with others. And, if you have any questions or suggestions, you can share them in the comments below!
More Posts for You:


