
Do you know how to check if something is downloading in the background on Windows 10? Windows 10 is notorious for downloading various updates in the background.
And this might be hampering your regular internet usage on Windows 10. As a matter of fact, many metered network connection users complained that without downloading anything, their data pack has finished.
And this is a common occurrence when you are using Windows 10 with a metered connection. But there are a few ways you can check if something is downloading in the background on Windows 10.
This post is all about explaining those methods. If you are struggling to find out which program is the culprit behind finishing up your data on Windows 10, this post will help you figure it out.
So, without dillydallying, let’s get to the point…
How To Check If Something Is Downloading In Background on Windows 10?
As we have mentioned above, there are several ways you can try to check if anything is downloading in the background on Windows 10. So, we will be sharing all these methods one by one in this section.
Method #1 From Task Manager Processes
First and foremost, we will talk about the most obvious method. You can actually get an idea about the activity of any applications on Windows 10 from the ‘Task Manager’.
After you have accessed the information, you can then even end the process or close the application that is the source of the problem. So, let’s learn how to access ‘Task Manager’ and ‘Processes’ on Windows 10.
Checking the Active Processes via Task Manager
- There are multiple ways to access Task Manager. First, you can press the ‘CTRL+SHIFT+ESC’ keys on the keyboard at the same time. And the Task Manager will open up.
- Also, you can right-click on the Taskbar at the bottom of the screen. And then click on the ‘Task Manager’ option from the overlay menu. Instantly, the Task Manager window will appear on the screen.
- By default, you will be on the ‘Processes’ tab. Here, you will find a list of all the apps and background processes of your PC.
- Next to each app/process, you will find the information regarding their CPU, Memory, GPU, Network, Disk, etc., usage.
- Among them, you will have to look for the data in the ‘Network’ section. This will indicate how much data is being used by any given applications or processes.
- If you click on the ‘Network’ column option at the top of the window, then the data below will be sorted by the ‘Most bandwidth used’ at that moment. You can then easily find out which app or process is actually using the data in the background.
If you find anything unusual, you can end that process or close the particular app. Let’s find out how to do it.
How to End a Process on Windows 10
- Go to Task Manager as we have told you earlier,
- Then, find the app or process you want to close/end and right-click on it.
- In doing so, an overlay menu will appear with a few options.
- From those options, click on the ‘End Task’ option.
Instantly, the process will be stopped. However, remember not to close or end any critical processes.
Method #2 Use the Windows Resource Monitor
The next method is to get the help of the ‘Resource Monitor’ utility. This is also another utility built into Windows 10. With the help of this utility, you can find ‘Network Activity of all the active processes. So, let’s learn how to do so…
Steps to Follow
- There is a couple of ways to access the ‘Resource Monitor’, and we will show you both of those methods here.
- First of all, you can press the ‘Win+R’ keys on the keyboard simultaneously.
- In doing so, the ‘Run’ box will appear on the screen
- Now, type in ‘resmon’ inside the Run box and press the Enter key on your keyboard. In doing so, the ‘Resource Monitor’ window will appear
- Or you can access the ‘Task Manager’ as we have shown you above
- Then, click on the ‘Performance’ tab at the top of the window
- Now, click on the ‘Open Resource Monitor’ button at the bottom of the window
- And the ‘Resource Monitor’ window will appear on the screen
- Typically, it will open with the ‘Overview’ tab at first
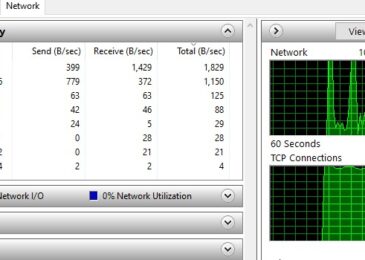
- So, you have to click on the ‘Network’ option from the top menu bar
- In this tab, you will find various options and lists of different apps that are using the internet
- Click on the ‘Processes with Network Activity’ and ‘Network Activity’ sections and find out the apps that are using the network connectivity at that moment
And if you find any processes that are finishing up your data in an unusual way, then you can close or end that process. To do that.
Steps to Follow
- Simply right-click on the name of the app/process you want to end under the ‘Processes with Network Activity’ section.
- Then an overlay menu will appear with a few options
- From them, click on the ‘End Process’ option
- At this moment, a new popup window will appear on the screen. Simply click on the ‘End Process’ button to close the popup window and end the process.
As usual, you should be careful not to close any important apps or processes.
Method #3 Check If Windows is Downloading Windows Update
Windows 10 is famous for downloading updates regularly without the permission of the user. And, it all happens in the background.
So, you would not know about it until you dig deep. In this section, we will talk about how to find out whether Windows is downloading updates on its own or not. If so, we will show you how to disable it. So let’s go…
Steps To Follow
- Go to the Task Manager by pressing the ‘CTRL+SHIFT+ESC’ buttons at the same time.
- Next, select the ‘Processes’ tab if you have not already.
- Then, scroll down and find out the process named ‘Services: Host Network Service’ from the list.
- Next, click on the ‘down arrow’ button next to that ‘Services: Host Network Service’ process.
- If you see another process named ‘Delivery Optimization’ under the ‘Services: Host Network Service’ process and it is using the network at that moment, it means Windows is downloading updates.
- So, right-click on the ‘Delivery Optimization’ process and click on the ‘End Task’ option from there to close the process.
How to Stop Future Windows Updates on Metered Network
If you don’t want Windows to download updates on the background over metered data, there is a way to stop downloading any further updates over metered data on Windows 10. Here’s how…
Steps to Follow
- First, search for ‘Settings’ on the ‘Search’ box on the bottom left corner of the screen.
- Then click on the ‘Settings’ app from the search result
- Next, click on the ‘Network & Internet’ option from the settings page
- Then, click on the ‘Manage Known Networks’ option
- From there, select the particular connection you are using and select the Properties option
- On this page, you have to scroll down and turn on the ‘Set as metered connection’ option
Remark: Or else, after the 3rd step above, click on the ‘Change Connection Properties’ option, and then you can enable the ‘Set as metered network’ option as well. This step will depend on the version of Windows you are using
You have to make sure that the ‘Automatically download updates, even over metered data connections (charges may apply)’ is turned off. You will find that option by navigating to ‘Windows Settings’> ‘Update and Security’> ‘Advanced Options’.
Method #4 Check on the Browsers or Download Manager Software
Yes, there could be something being downloaded on your browser or the download manager software. And, you might not be aware of that. So, it is always a better idea to check whether any download is going on or not.
Method #5 Check Your Internet Speed
Another trick to find out whether something is downloading in the background on Windows 10 is to check the current internet speed. Let’s say you are watching a video on YouTube. Suddenly, the video started to buffer even though it was fine a minute ago. If your internet connection’s speed is looking as usual, then it is an indication that Windows is downloading something in the background. Otherwise, the video would not usually buffer.
Method #6 Limit Background Data
The last method is not actually a way to find out if anything is being downloaded on the background on Windows 10. However, we will share a quick tip to limit background data usage on Windows 10. So that you will not have to worry about your metered data being finished all of a sudden, let’s go…
Steps to Follow
- Go to the ‘Settings’ page on Windows 10 by following the steps above.
- Then, click on the ‘Network & Internet’ option from there.
- Now, click on the ‘Data usage’ option from the left sidebar of the screen.
- At this point, you will find a section called ‘Background data’ on the main window.
- You will have to select ‘Always’ under the ‘Limit what Store apps and Windows features can do in the background’ section.
From now on, Windows will be restricted from using data in the background to update or download any features related to the Store apps or Windows features.
Final Lines
Windows 10 is the latest and most popular operating system from Microsoft. It comes with a lot of features. At the same time, Microsoft tends to add new features and functionalities to the OS regularly.
Thus, you might notice that Windows is downloading those updates in the background. This feature is there to ensure your OS is always up to date with the latest software and features. It also makes your PC secure.
However, for metered data users, this automatic update feature is not that helpful. We know you would like to download updates manually. Hence, we have shared a few ways you can identify if Windows is downloading something in the background or not.
Also, we have shared some tips to stop or limit background data usage on Windows 10.
We hope this post was helpful to you. If so, you can share this with others. And, don’t forget to let us know your thought and opinions in the comments below!
")

